Interchangeable flap messenger bag tutorial
in which I push Microsoft Paint to the limit
This tutorial explains how to make this messenger bag which I posted on Craftster. My apologies for the long post... I just wasn't sure where else to put this. I'm a very intuitive (read: no-planning! Measure twice and cut once... sure, if you're a sissy) sewer, so it's hard for me to describe exactly the process I went through. But I hope this is useful.
I'm happy to answer questions about this. Comments on this blog are emailed to me so feel free to reach me that way. I also have this available in a printer-friendly PDF version. I will be happy to send it to anyone who asks.
Pattern Pieces
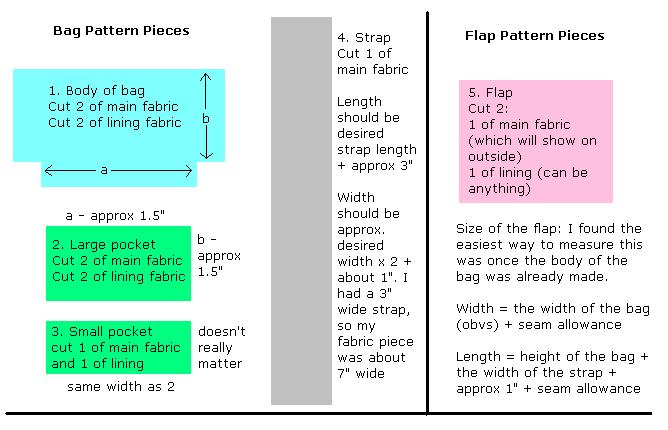
I haven't given size instructions here--everyone should make everything whatever size they want :) But note that the body of the bag (piece 1) should have sides and a bottom at least 1.5" bigger than the large pocket (piece 2). This is so that your pieces will be the correct size in Step E.
Step H. shows how the bag body rectangles are transformed into a bag. If you're not sure how this will work, use paper to make a mock-up, and follow the instructions in Step H to see what size of bag this will result in. This process is so magical I can hardly begin to describe to you how it works, and I frequently have to make paper versions of it myself just to convince myself it still works.
Also, this may seem obvious, but if you don't know how long to make your strap, measure the strap of a bag you really like.
Phase 1: Make the Pockets
Because of the way this bag is constructed, the pockets should be made first. The size of the pockets (piece 2 in the pattern diagram above) will be the approximate size of the body of the finished bag.
A. Take piece 3 - the small pocket
Place the outer fabric and the lining, right sides together, and pin the two long sides. Sew these two long seams.
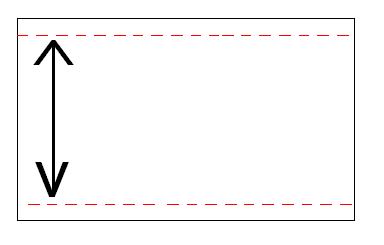
Note: the distance between the two seams (indicated with arrows) will be the depth of the small pocket.
Turn this piece inside out. Press the seams you just sewed, and then sew them again (right-side out this time.)
You should now have a strip of fabric with finished seams on the top and bottom, and ragged edges.
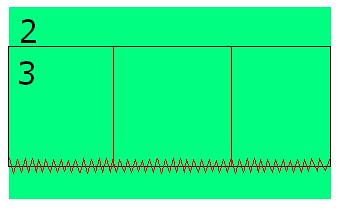
B. Take piece 2- the large pocket (1 of main fabric only)
Place 1 piece of mf, right side out. Place the small pocket on top, also right side out. Sew along the bottom with a zig zag stitch. Then sew the small pocket into three compartments (or however many you want) with a straight stitch. These stitches are shown in red on the diagram below. You could make these pockets the right size for whatever small stuff you want accessible in the front of the bag--pens, lipstick, cellphone, ipod, etc.
C. Place the large pocket you just made and 1 lining piece, right sides together, and pin around all four edges.
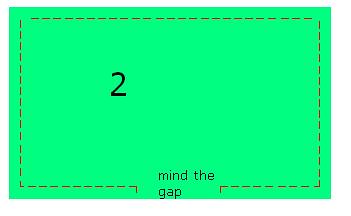
Sew around the four sides, leaving a gap of 4" or so at the bottom.
Turn this piece inside out, being sure to poke out all the corners. (I use the pokey end of a wooden spoon for this.) Sew around the ouside again, with it right side out. When you do this, make sure the gap (the hole through which you turned the piece inside out) is pinned and sitting flat.
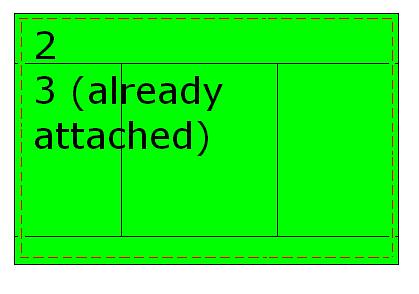
Result: A large pocket, with the small pocket attached, with nice finished edges. Like this, but probably not neon green:
D. Prepare the back pocket.
Place the remaining main fabric and lining pieces of the large pocket (2) and pin them together, right sides together. Repeat the pinning and sewing in step C above, turn inside out, and sew around the outside again.
At this point you should have two nice pockets with all finished edges, one with a smaller pocket attached. The fussiest part is done!
Phase 2: Attach the Pockets
E. Take 1 piece of the bag body, piece 1, in the main fabric. Attach the front pocket (the one with the smaller pocket already attached) around the sides and bottom with a zig zag stitch.
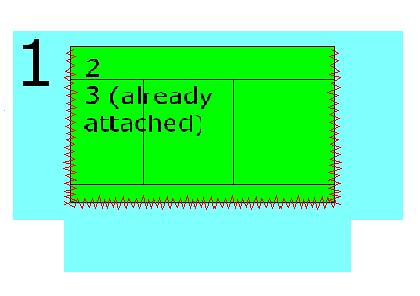
Note: the attached front pocket should not reach the bottom or top of of piece 1, nor should the corners of the pocket touch the cut-out corners of the rectangle. You need some space around it on all sides for seaming. If the pocket is too big at this point, you need to make either a smaller pocket or a larger bag body.
F. Attach the back pocket to the other bag body piece of main fabric (1), following the same steps.
You should now have the two bag body pieces in the main fabric, each with a pocket attached.
Phase 3: Assemble the Bag
G. Take the two pieces from Phase 2 above and place them RIGHT SIDES TOGETHER. You should not be able to see the pockets.
Pin and sew the three sides as shown:
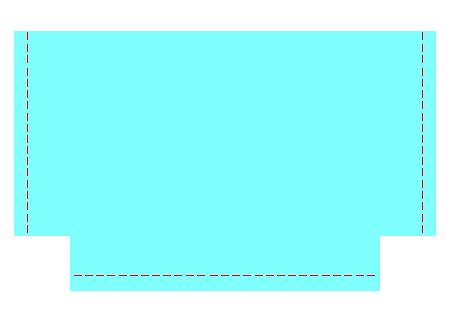
DO NOT SEW THE CORNERS. There should be gaps.
H. This is the magic part! Take the two sides and pull them apart, then pin and sew the corners of the bag, as shown in this super-professional photo.

This seam makes the corners on the bottom of the bag. It can take a little practice making bags this way, so you may want to practice on some scrap fabric before making the proper bag.
I. Repeat step H with the other corner. You should now have a bag shape, but with an unfinished top.
Phase 4: Make the Lining
J. Repeat steps G-I with the two pieces of lining fabric (piece 1). This part can be a bit finnicky, as you want the resulting "bag" (made of lining fabric) to be ever-so-slightly smaller than the main fabric bag.
The good part is, the lining won't show, so if you have to fudge it a bit no one will know. :)
Phase 5: Assembly
K. Turn the bag proper inside out, so the pockets are on the outside. Place the lining "bag" inside the bag proper. All the seams should be between the two layers, so they won't show when you open the bag.
If you can see seams, you need to take the lining out, reverse it, and then put it back in.
L. Take the unfinished edges around the top of the bag and turn them inward, pinning as you go. Do this to both the main fabric and the lining, to make a smooth, even join around the top.
M. Once you have pinned the bag and lining together, with the edges of both turned in, sew them together--BUT ONLY ABOVE THE FRONT AND BACK POCKETS. Leave the sides open (to insert the strap).
Phase 6: Make the Strap
N. Take piece 4-the strap fabric. Fold it in half lengthwise, good side in. Pin along the long side. Sew this long seam. You should now have a long tube, open at both ends.
O. Turn this tube inside out (this can be tough--the wooden spoon again!) and press it flat. Pin along both long sides, and sew each long side. You should now have a long flat strap with stitching on both sides, and open, unfinished ends.
Phase 7: Attach the Strap
P. Place the unfinished ends of the strap into the gaps left on the sides of the bag. Insert 1" to 1.5" of strap on each side. Pin in place, and then sew a rectangle to attach, like this:

"Hem" the bag, sewing around the top of it completely, to firmly attach the straps and the bag shell and lining.
Phase 8: Velcro!
Q. Cut a strip of velcro just slightly shorter than the length of the back pocket. Attach it to the back of the bag, between the bag body and the back pocket.

Cut a small 1.5" strip of velcro and attach it to the inside of the back pocket.
The bag is now done!
Phase 9: Flaps
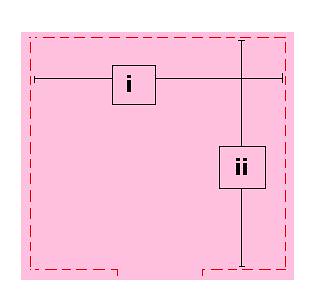
R. Measure the length of your velcro strip from step Q. This will be measurement i.
Measure the depth + height of your bag, as shown:
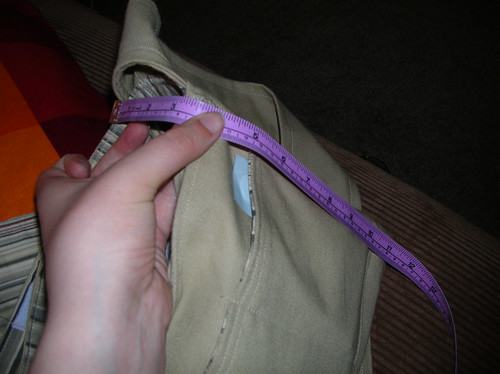
This will be measurement ii. (The bag in the illustration is around 11" depth + height)
These measurements will be the size of your flaps, and correspond to the measurements on the next diagram.
S. Take the flap pieces 5 and place them, right sides together. Pin around the outside of this rectangle, leaving a 4" gap along one of the sides.
NOTE: Make sure the area inside the pins matches the measurements you took in step R. The size of the fabric doesn't really matter; the distances between the seams will determine the exact size of your flaps.
T. Through the gap, turn the flap inside out. Pin and sew around the outside on all 4 edges.
U. Attach the velcro. A strip the same length as the one on the back of your bag goes on the top of the flap, lining side. a 1.5" piece goes on the main fabric side. If you are having trouble figuring out where the velcro should go, insert the flap between the back of the bag and the back pocket, to see how the flaps will fit in.
V. Pat yourself on the back, you're done! Time to make 1,000,000 more flaps!
Note: Making bags by cutting corners out of rectangles is a trick I learned from another tutorial on Craftster. I've lost the original link, but if anyone has it, I would love to post it. It's a really clever way of making very elegant bags, with less sewing--and less of my nemesis, cutting.
Note:

This tutorial is licenced under a
Creative Commons Licence!
This means it can be freely reproduced, changed and distributed without permission, for non-commercial purposes, and with attribution. Questions? Please contact me.


4 comments:
awesome! i've had all this fabric here and really couldn't make up my mind about which one(s) to use for the messenger bag...problem solved!
please PDF me when you can.
heyrae at gmail dot com
Thanks!
Love your tutorial, please email the pdf jaschild at sbcglobal dot net.
great post ..pl email me the pdf file at aamodr@gmail.com
Tight. Now I have an excuse to make "tons" of bags ;D
could you send the PDF to vintage.chroma@ymail.com or icanhaspopsicle@gmail.com? Thanks a ton C:
Post a Comment